Saturday, May 31, 2014

Mario Kart 8 Unboxing with GameStop Pre-Order Poster & Review

What?  Mario Kart 8 for Nintendo Wii U
Where Did You Get It?  GameStop
What Did It Cost?  $59.99 Plus Tax
Promotions?  Free Mario Kart 8 Poster with Pre-Order
Promotion 2: Free Nintendo Game with the Registration of MK8 in Club Nintendo
What Was Stock Like?  Well Stocked!

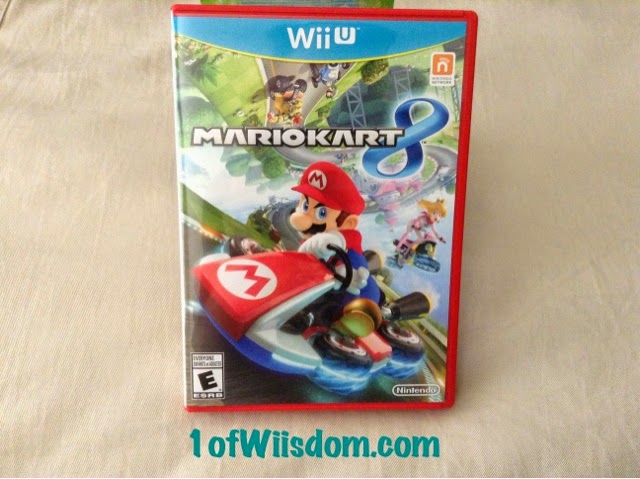
Unboxing Mario Kart 8 and Checking out GameStop's Pre-Order Poster


I have waited a long time for this game!  I am a huge fan of the Mario Kart 8 Series and could not wait to get my hands on this title!  I picked up 2 copies, one for myself and one for my Nephew since it tied in perfectly with the last day of school (props to Nintendo for the Friday release!).

My Nephew and I logged a lot of time playing Mario Kart Wii and Mario Kart 7 together...In fact, it would be easy to say Mario Kart Wii is the reason I got into wanting to record gameplay footage.  Every night we raced there was some epic comeback or insane ending...We always finished with, "I wish we would have recorded that."  So, I started recording!

I was miffed we didn't get the free Blue Shell/Spiny Shell like Europe did, but Club Nintendo does offer a free game with the registration of Mario Kart 8.  These aren't bottom shelf, $5.99 games either...They are premo, Nintendo Titles!  The Legend of Zelda Wind Waker HD, Pikmin 3, Wii Party U, and New Super Mario Bros. U are the 4 titles you can choose from...I always encourage people to sign up and register their hardware and software with Club Nintendo for reasons just like this, not too mention the other cool prizes.  I am currently torn between Wind Waker HD and Pikmin 3...

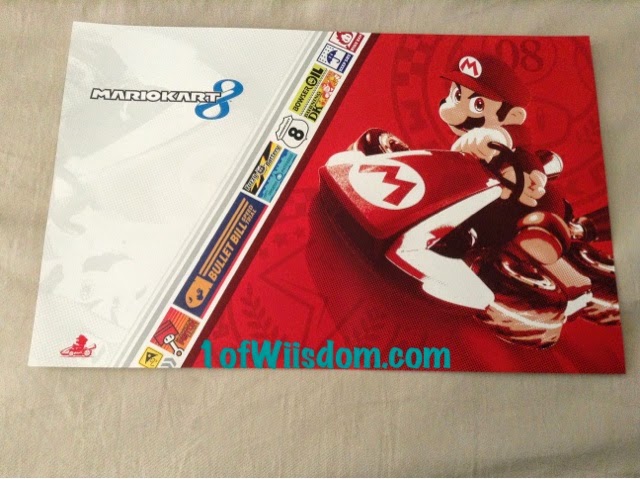
The other thing that miffed me was the total lack of advanced notice on pre-order, or day of purchase bonuses...I waited a long time for announcements, or a potential blue shell equivalent here in the US and all that turned up was GameStop's poster.  As it turned out, Walmart and Target both had Wii Wheels going with the game...but I was unaware of those until the Sunday before release.  Toys'R'Us has the BOGO40%, which is great, provided there is another title you want to pick up.  That said, I went for the pre-order bonus glory in GameStop's Poster.

It isn't the flashiest thing, but it is neat and will look great hanging.  It measures 11" x 17" for those wanting to frame it...Although, since it is double-sided that will kill off one display angle.  I suppose though, most will have a favorite side and can mount it facing outwards.

The front side features a slash cut design with the Mario Kart 8 logo on one side and Mario in his anti-gravity kart on the other.  The dividing line is some race track advertisements.


The back side features another slash cut styling with snapshots of several of the new tracks meshed with the load screen style art.


I personally would have preferred a very simple poster.  Perhaps a blown up version of the cover art itself on one side and the back side featuring all the track names, characters, and items.  I suppose I value information and a helpful snapshots a bit more than modern styled art, but to each his own.  It was free, it is Mario Kart related, and I really can't complain.  I do hope though that Club Nintendo will offer up a 2 or 3 Poster Set as I described: Cover Art, Tracks and Items, and Characters.


The game gets a special Red Case which is rare and cool, despite me personally being a fan of the standard Wii U Blue.


The instruction manual is basically 1 page and in full color, but lacks detail.  I still miss the old mega-thick, informative manuals of old.

That said, this game is great!  The hours of fun and infinite reply value make it a steal.  It will deliver solidly as a gift of any sort and will likely maintain a perch at the top of the charts as word continues to spread with peer influence.  Mario Kart 8, in my opinion, is an example of software that moves hardware.

If you don't own a Wii U, the Mario Kart 8 Wii U bundles is the way to go and a tremendous value.  You will not regret purchasing this game.

I have currently played about 3 hours of Multiplayer with my Nephew and logged another 2-3 in the solo Grand Prix.  The new tracks are outstanding!  The graphical prowess of the Wii U definitely impresses...the retro cups featuring tracks born on the Wii version (like Moo Moo Meadows) are stunningly different...you can pick up the feel, lines, and sounds...but graphically they are like night and day.  I never had issues with the graphics on Mario Kart Wii, but Mario Kart 8 absolutely blows it out of the water.

When you factor in the infinite replay of Mario Kart Wii, but now have new, never before played characters (The Koopalings) AND the customizable karts and bikes like in Mario Kart 7 on the 3DS, you have opened up the door for tons of options and the chance to literally squeeze every last .001 off your time trial records.  This feature will be very much appreciated by hard core players.

The online mode has a great, simple interface that will get you racing in no time.  You can hop on regionally, worldwide, with friends, or via tournament.  You can also set up private rooms etc. to keep the action close to home, or within your circle of friends.

I've yet to play Battle Mode, but my Nephew and I should do that tonight.

This game seems to me an improvement over Mario Kart Wii and that game has yet to get boring to me...I envision a full run from this game as well.  Hardcore players will love the new elements and characters to master while breaking records, and casual players will enjoy the pick-up-and-go play style that the series is known for....Mario Kart 8 can be your weekend retreat for a good time, or an obsession hunting quicker times and Tourney wins.

Regardless your age, skill level, or penchant for video games, Mario Kart 8 will entice everyone to get involved...even if it is just as a spectator.  There is so much built in to the visuals, it is a little overwhelming at times trying to take in the surroundings AND win the race.

This is truly a must own for any Wii U Owner, Mario Kart fan, or gamer in general.  If you don't have a Wii U, this is reason enough to get one!

Myself and my Nephew will be playing this one for years to come...Thanks to Nintendo for delivering up yet another first party smash hit!

Friday, May 30, 2014

Zoo Lou Upgrade Paths and Damage Numbers

Zoo Lou Base Upgrades

Legendary Zoo Lou Base Upgrades

Zoo Lou Attack Damage Numbers

Zoo Lou The Bucking Boar Upgrade Path

Zoo Lou The Wild Wolf Upgrade Path


Zoo Lou is a very unique character.  He never physically attacks enemies himself, but rather relies on summoned animal friends to do the dirty work.  You have Birds, Boars, and Wolves in the arsenal.  The Birds are the primary attack, the Wolf is the secondary attack, and the Boar is the tertiary attack.  The Base Upgrades address Birds and add the Boar along with one supporting upgrade.  The Wolf is left completely out of the loop in the Base Upgrades.

Naturally, many would think, "Okay, the Wolf was left out, I should take Wild Wolf to balance things out."  The Strategy Guide even boldly states, "The Wild Wolf Path edges it out (Bucking Boar Path) because Bird Call upgrades also help out against groups and you get extra food as a bonus."  I have seen the strategy guide state the obvious and offer insights, but I can't recall seeing it blatantly tell you which path is better

And now that I have seen it...I disagree.

Wild Wolf is an okay path...in fact, it is probably a great path for those having trouble in challenges or tough portions of story mode.  Alpha Wolf increases the attack damage and health of the wolf and Hunger of the Wolf gets him to attack a little quicker.  That said, Hunter and Gatherer is the big payoff as this is where the Wolf will dig up food when your health is low.

I didn't get to check the health of the wolf, or have food dug up for me, but I feel I know enough.  I can't argue that getting food at low health is of great value, but what about needing damage support instead of the food?  My biggest disappointment is that there was never a 2nd Wolf.  Now take a 2nd Wolf into the mix and you have one aiding in on immediate protection and the other digging up food and we have something going.

That said, I still would have to recommend Wild Wolf for beginners and players who need a character with good health attributes to get them through tough parts of the game, whatever those may be...Hunter and Gatherer will definitely be worth while for those endeavors.

The Bucking Boar turned out to be a big surprise.  I'll say that just as not getting a second wolf disappointed me, the fact that the boar never got faster was also a disappointment.  What wasn't a disappointment was going from 18 to 58 Armor.  That +40 is a big deal to me and can be appreciated just as much by pretty much any Portal Master who realizes that increased armor on that scale can very well keep you from winding up at low health and needing food.  Hog Wild really didn't do much for me, but Rough Rider did.  This sounded lame and I was fully anticipating a few pebbles flying up and dealing some meager damage number like 5-8, or 10-15.  The 30-45 is great!  Plus, factor in that you are doing damage on the boar from the front via Raging Boar and then have the rocks out the back and you have a great ranged attack from what was once slow and very limited in range.

However, the biggest asset in my opinion is the fact that you get Rough Rider's rocks and Thicker Pigskin's Armor in conjunction with the simple observation that you can summon both the Wolf and Birds (even the Soul Gem Birds of Prey) WHILE riding on the boar!  That is a big advantage in my opinion and definitely shifted the tables in favor of Bucking Boar.

Again, for rookies and players needing a Skylander capable of regenerative health, take Wild Wolf.  Similarly, if you just really like the Wolf attacks, take Wild Wolf.  For those on the fence, and the small few that might honestly prefer the Boar, go ahead and take The Bucking Boar Upgrade Path...I know you will not be disappointed!

Bumble Blast Upgrade Paths and Attack Damage Numbers

Bumble Blast Base Upgrades

Bumble Blast Attack Damage Numbers

Bumble Blast Bee Keeper Upgrade Path

Bumble Blast Honey Tree Path


Bumble Blast is a very solid character and I can see why so many say he is their favorite in the game.  Granted, he is slow, but that is one of the negatives you can have on the guy.

The Bee Keeper Path is what I feel almost everyone will be initially drawn towards taking.  From that segment, I wouldn't be surprised if 7 in 10 don't wind up taking it.  While I don't think those that take it will be disappointed, I would personally go with Honey Tree.

Bee Keeper will offer up three bees at once (Bee Armada), increased damage from more bees (Stirred up a Nest), and an attack that deals anywhere from 32-62 (Queen Bee).  I equate this path to a kind of Life Element rendition of Trigger Happy.  I think most everyone will be content with this path...the only catch is to maximize damage you will want to make sure you have Honey Glob out and about.

The Honey Tree Path is nowhere near as flashy.  It's biggest selling point to me was Honeycomb Bark for the +40 Armor (again, I am a sucker for Armor and Speed).  That said, it turned out to deliver BIG TIME.  Honey Buzz Blast lets you charge Honey Glob and unleash not only the glob of Honey, but pre-packed angry bees.  Heavy Honey ups the damage and slows enemies, which is a very nice asset considering how slow Bumble Blast is.  Couple the instant offense, slowed enemies, and increased Armor and I think you have the superior path.

For veteran players, I would encourage you to take Honey Tree.  For rookie players, I think you would also benefit from Honey Tree, but if you really like the Beezooka, you would want to take Bee Keeper.  The Bee Keeper isn't a bad path, it is just a more direct, blatantly offensive path.

I personally, with no hesitation, back Honey Tree.  It delivers my armor, helps offset Bumble Blast's lack of speed by slowing enemies, and turns Honey Glob into a powerful attack that you can then use the base upgrade Beezook attacks with, or charge for instant bee-satisfaction.  I ultimately feel it makes him a more well rounded character.  The Bee-Pack Backpack is a big addition to either path, although some may object to it aesthetically...Despite it's less than desirable looks, it is worthwhile in my opinion due to the frequent, powerful attacks.

Wednesday, May 28, 2014

Hoot Loop and Enchanted Hoot Loop Upgrade Paths with Attack Damage Numbers Skylanders SWAP Force

Hoot Loop Base Upgrades

Enchanted Hoot Loop Base Upgrades

Hoot Loop Attack Damage Numbers

Enchanted Hoot Loop Dream-Weaver Upgrade Path (Top)

Hoot Loop Hypno-Owl Upgrade Path (Top)

Enchanted Hoot Loop Telekinesis Upgrade Path (Bottom)

Hoot Loop Escape Artist Upgrade Path (Bottom)

Hoot Loop is a Magic Element Swapper with the Teleport Ability.  The teleportation abilities alone make him very unique.  I think he and Night Shift might be representative of my favorite ability of the 8 found in SWAP Force.  Don't hold me to that just yet, but I am a big fan of teleporting in SWAP Force.

You really can't go wrong with any of Hoot Loop's Upgrade Paths, but they are very different.

Dream-Weaver is my personal choice for the top end...It plays a lot like Double Trouble's Channeler.  It hits very hard and you can hold the attack infinitely.  That said, Hypno-Owl is the more unique path and winds up doing pretty good damage while slowing enemies.  This one comes down to play style.  I think Dream-Weaver is the best choice for most, but if I just had one Hoot Loop, I think I would have been inclined to take Hypno-Owl, just because of how unique it is.  The Damage Numbers are pretty much the same (+/- 1), so this one, more than most, really comes down to personal preference.

Telekinesis is a nice path and probably the better choice for new players, or those looking for an easy way to deal damage.  Escape Artist is actually able to do similar damage, but not in the same spot...It is good for a quick hit-and-run type scenario, although I consider it more of an evasive move.  Telekinesis has to be charged, but is easy to execute.  Escape Artist, in my limited experience, can be hit and miss.  If you plan to teleport over, do damage, and escape back and it fails, you might be up a creek.  I'm sure it gets better over time, but I had some issues getting 100% success with it.

The good news, for those that have Hoot Loop and Enchanted Hoot Loop is that you can take all of the paths and see what you like best first hand.  Again, you really can't go wrong with any, the top end is almost identical damage wise and the bottom plays similar with Telekinesis being a bit easier to execute than Escape Artist.

Sunday, May 25, 2014

Custom Painted Skylanders

Welcome!  I hope your weekend has been full of sky-blues, a dash of sunshine yellow, and the bright colors of Springtime...

Nah, not really...but I do hope everyone is having a great Memorial Day Weekend!

Something I have wanted to do for a LONG time is treat some of my Skylanders to a custom paint job.  First, I think some would look cool in alternate colors.  Second, I have so freaking many of these things it will actually allow me to distinguish between them (ie is this my Sandhog Terrafin, or Brawler Terrafin).  Third, you can create customs...Think Star Strike should have been pink?  You can make it happen!  Want to have a Legendary Terrafin, a green Zap, or a Crimson Red Hex?  It is all possible!

Supplies are really cheap and all you will be out is a little time.  Granted, some are easier to paint than others and there is a lot of detail in these figures...The more details you recreate (or re-color) the longer you will be involved.

That said, I plan to give this a go an see how everyone likes it.  Judging by my families reaction I think everyone should have some interest in this.  My Nephew was very impressed, so hopefully that sentiment carries over as well.

Anyway, this post will outline the Introduction and any subsequent custom painted Skylanders.

Stay tuned for updates!

Custom Painted Skylanders : Cheesy Introduction, Art History, and Knockout Terrafin


Custom Painted Skylanders Episode 1: Knockout Terrafin's Reveal
Legendary Blue Metallic Knockout Terrafin


Custom Painted Skylanders Episode 2: 
Green Rattle Shake

Custom Painted Skylanders Episode 3
Mystic LightCore Hex


Custom Painted Skylanders Episode 4
Patriotic Blast Zone (Full Repaint!)

Custom Painted Skylanders Episode 5
Heartbreaker Roller Brawl

Custom Painted Skylanders Episode 6
Quicksilver Slam Bam

Custom Painted Skylanders Episode 7
Legendary Blue Metallic Terrafin (Series 2)

Custom Painted Skylanders Episode 8
Scarlet Stealth Elf (Series 2)

Custom Painted Skylanders Episode 9
Acid Bomb Eruptor (Work in Progress)


Custom Painted Skylanders Episode 10
Savior Stump Smash (Series 2)

Custom Painted Skylanders #11
Legendary Chopper

Custom Painted Skylanders #12
Enchanted Torch

Custom Painted Skylanders #13
Legendary Blue Metallic Terrafin (Series 1)

Custom Painted Skylander #14
Blackberry Cynder

Custom Painted Skylander #15
Autumn Blast Bumble Blast

Custom Painted Skylander #16
Quick Silver Rip Tide

Custom Painted Skylander #17
Doom Raider

Custom Painted Skylander #18
Legendary Blue Metallic Shark Shooter Terrafin


Saturday, May 24, 2014

Unboxing Kickoff Countdown Skylanders SWAP Force

What? Kickoff Countdown, Tech Element, SWAP Force Newlander
Where Did You Get It? Toys'R'Us
What Did It Cost? $10.99 plus tax (BOGO50%)
What Was Stock Like? Well Stocked!
What is Included? Kickoff Countdown, Stat Card, and Sticker Sheet

Unboxing Kickoff Countdown

Skylanders SWAP Force Character Introduction 74: Kickoff Countdown 

Kickoff Countdown vs the World: Filmed with thewalkthruking


Kickoff Countdown
Tech Element, SF Newlander


Slogan: "I'm the Bomb!"

Card Stats
Power: 115/200
Armor: 90/200
Agility: 60/200
Luck: 45/200
Totals: 310/800

LightCore Countdown, Kickoff Countdown, Countdown

SWAP Force, New Tech Corelanders

Tech Element SWAP Force Lineup (New Characters)

SWAP Force Tech Line-Up (Complete minus Silver Sprocket)

SWAP Force Tech Element Special Edition Figures

Stink Bomb Upgrade Paths and Attack Damage Numbers

Stink Bomb Base Upgrades

Stink Bomb Attack Damage Numbers

Stink Bomb The Art of Skunk-Fu Upgrade Path

Stink Bomb The Art of Acorns Upgrade Path

Stink Bomb Skunk Cloud Controller Upgrade Path

Stink Bomb Sneaky Tricks Upgrade Path

Stink Bomb is another very unique character in SWAP Force.  Up top he benefits the most from Sweeping Skunk Fu, a throw and ready charged attack that deals nice damage in 90 degrees from the character.  The Skunk-Fu Stars (base attack) do decent damage and can be fired very quickly.  

On the bottom end, Hidden Tail, becomes his biggest hit as it can deliver a 70-105 hit while you are invisible.  That said, I am not sure Sweeping Skunk-Fu and Hidden Tail don't remain his best attributes, despite the availability of 4 Upgrade Paths.

Up top, I would go with Art of Skunk-Fu.  If this path simply boosted damage from the throwing stars it would have been solid.  Similarly, an overall armor boost would have been another great addition.  Actually, the shield + armor + an increase in damage would have been preferred by me.  That said, this one allows you to throw Skunk-Fu, his hardest hitting top end attack and gain an orbiting ring of Stars that will shield you.  They don't do incredible damage, but it is nice to have it since you'll likely use Sweeping Skunk-Fu a lot.  My advice is to keep the shield active as much as you can when in tough situations.  The best thing about the shield is that you can have it active and still throw a Sweeping Skunk-Fu, which of course, renews the time on the shield!  I would recommend this past to most everyone, particularly those who like the defensive techniques and most new players.

The Art of Acorns is pretty neat, but I don't see it as being too practical.  It is basically a charged attack that shoots a poison acorn.  You have to charge it 3 seconds, or 3x as long as Sweeping Skunk Fu.  My biggest issue comes from the charge time and then the fact that it is a long ranged attack like the primary Skunk Fu Stars.  The overlap kind of kills it for me.  This path could be useful, but you would have to work to set it up...And you would then have to really want to use it when you can shoot off the Skunk-Fu Stars so much faster.  I think we would have been better suited upgrading One-Inch Palm into a close quarters punch/strike, which would have tied in well with the Kung Fume background.  The Acorn attack, could then have been included in place of the Soul Gem.  Just my take.  I'd recommend this to anyone that prefers adding another long ranged projectile, or those who just really love acorns.

Down low, I am not a huge fan of either path, but the Soul Gem is nice...although I feel it could have been foregone by allowing you to remain invisible when attacking as a default feature.  Skunk Cloud Controller might be the better path in all honesty.  I really like the Sneaky Tricks concept, but the fact you have to walk slow is somewhat of a deal-breaker.  The best thing about being invisible is your ability to escape and Stink Bomb, like Stealth Elf is pretty quick.  I sometimes even have trouble going slow enough for the spikes to deploy, and that is with me trying.  The other catch, from a PvP point is the spikes make it really easy to find you.  Neither is quite what I expected, but I give the edge to Skunk Cloud Controller.  This is because the clouds linger and can do damage to several enemies, plus to execute the second cloud you have to re-enter Skunk Cloud, which gives you a chance to use Hidden Tail again.  I would suggest Skunk Cloud Controller to pretty much everyone, but with the caveat that Sneaky Tricks is pretty cool and unique, just be fully aware you have to move slowly for it to function.

Wiisdom's Picks: The Art of Skunk-Fu and Skunk Cloud Controller 

Friday, May 23, 2014

Grilla Drilla Upgrade Paths and Damage Numbers Skylanders SWAP Force

Grilla Drilla Base Upgrades

Grilla Drilla Attack Damage Numbers

Grilla Drilla Monkey Master Upgrade Path

Grilla Drilla Drilling Punches Path
--Coming Soon, Need a 2nd GD--

Grilla Drilla Coconut Caretaker Upgrade Path

Grilla Drilla Banana Blaster Upgrade Path
--Coming Soon, Need a 2nd GD--

Please Note: This post is a work in progress until I get a 2nd Grilla Drilla...

Monday, May 19, 2014

Blast Zone & Dark Blast Zone Upgrade Paths Skylanders SWAP Force

Blast Zone Base Upgrades (Top and Bottom)

Blast Zone Attack Damage Numbers

Blast Zone Ignition Upgrade Path (Top)

Blast Zone Reaction Satisfaction Upgrade Path (Top)

Blast Zone Fuel Injected Upgrade Path (Bottom)

Blast Zone Temperatures Rising Upgrade Path (Bottom)

Dark Blast Zone Fully Upgraded 


Blast Zone is an absolute beast in box stock form.  My Nephew loved being him in our Battle Tournaments because he could almost always win with just Bomb Throw, unless of course he was facing Dark Blast Zone!

I never understood why I didn't hear more chatter about him...I figured the Upgrade Paths must have been lackluster for him to be that ignored in chatter amongst Portal Masters.

However, after upgrading him I know that can not be the case.  Blast Zone has some great Upgrade Paths.

Up top, I think the obvious choice for most people is the Ignition Path.  This takes the already potent Bomb Throw and further enhances it.  Only catch is you have to have a fire wall to throw through.  This is the best choice for most people.

I prefer Reaction Satisfaction.  It might actually  be easier for rookie players to master as well.  Flame Breath, his tertiary attack, was left untouched in the base upgrades.  Reaction Satisfaction allows you to complete a circle and be rewarded with an explosion.  Phase 2 of the path increases both damage and area.  This to me is the best option not only because it does great damage, but because I felt it balanced him given how potent Bomb Throw was with just Power Bombs factored in...

On the bottom end I prefer Temperatures Rising.  It is a path that generates a fiery aura after dashing that allows you to drift towards enemies you want to target and do additional damage past your other attacks.  In other words, I feel it is a bit more precise than Fuel Injected.

Fuel Injected, however, hits much harder on the face value than Temperatures Rising.  At the end of  a dash you shoot off a fireball that does big damage to enemies.  The only issue is the lack of control.  You may want it to cascade towards a geargolem, but if a Greeble sneaks up from the side, it can auto-lock on the less than formidable enemy and fail to deliver like you had hoped.  That said, it is a minor issue and I think most will prefer Fuel Injected.

That said, any upgrade path for Blast Zone is well done and easy to follow, I just personally prefer Reaction Satisfaction for the balance and Temperatures Rising for the control.

Smolderdash Upgrade Paths with Damage Numbers Skylanders SWAP Force

Smolderdash Base Upgrades

Smolderdash Attack Damage Numbers
^Click the Spreadsheet to make it Larger^

Smolderdash Sun Forger Path

Smolderdash Sun Forged Path


Smolderdash upgraded very well.  I am surprised I haven't heard more people taking about her.

Sun Forger is going to be the path of choice for those who really like the concept of her flame whip and dividing up the Super Giant sun.  You also get a bump in Critical Hit.  I think this might be slightly better for PVP.

Sun Forged is my path of choice.  As always, when Speed or Armor is tied into a path, 95% of the time I will prefer it for that reason.  That said, Solar Blast is more effective to me and despite not being a fan of Sun's Core overall, it is a nice aura ability that you can control more precisely.  I think this path would be better for story mode than Sun Forger.

Ultimately, Smolderdash upgrades very well with just the base enhancements.  You can't go wrong with either path...You ultimately need to pick if you want Critical Hit or Armor and if you like Super Giant or Solar Blast better.

Sunday, May 18, 2014

Scratch Upgrade Paths with Damage Numbers Skylanders SWAP Force

Scratch Base Upgrades

Scratch Attack Damage Numbers

Scratch Ruby Upgrade Path

Scratch Sapphire Upgrade Path


What can I say here, Scratch is formidable box stock, turns into a legit beat with base upgrades, and either path is just icing on the cake.

I think most people would benefit from the Ruby Path, especially newcomers to the series.  You bump up the Critical Hit Chance, have a nice claw-roll combo on the primary side, and the Ruby Mask impacts a larger area.

That said, I personally prefer Sapphire.  Why?  I am not big on the "increase Critical Hit" upgrades and I am HUGE on Speed, or Armor.  Sapphire Slash is a cool, air based attack, but honestly I think the base upgraded tertiary still takes the cake.  Sapphire Mask slows enemies and while I'd rather have the increased damage of the Ruby Mask, it plays in well with your speed increase and vortex abilities.

Bottom line with Scratch, you really can't go wrong with either path...I think for the vast majority Ruby will be preferred.  Keep the aesthetics in mind too when making your choice.

Pop Thorn Upgrade Paths with Damage Numbers

Base Upgrades

Pop Thorn Attack Damage Numbers


Tough and Puffed Upgrade Path

Controlled Breather Upgrade Path


For most players, especially rookies, I would suggest Tuff and Puffed.  I think most prefer the roll attacks you get with Rollerpuff and Prickly Body is a huge asset to counter mobs of enemies as it seeks out who hits you and delivers big hit points.

I myself perfer Controlled Breather.  Aero Trampoline is very hard hitting amplified and the biggest deal to me is Scattered Winds.  I'm a big fan of his gusts (ie while Popped), so this path makes sense to me.

If you also prefer his gusts and the speed Pop Thorn has while popped, take Controlled Breather.  If you prefer his Puff state and spike attacks take Tough and Puffed.

Thursday, May 15, 2014

Doom Stone Upgrade Paths and Attack Damage

Doom Stone Base Upgrades

Doom Stone Attack Damage Numbers

Doom Stone Column Clubber (Top)

Doom Stone Jaded Fighter (Top)

Doom Stone Serious Spinner (Bottom)

Doom Stone Carved Belt (Bottom)


As mentioned several times, Doom Stone was my most anticipated Skylander Swapper.  Aesthetically he is awesome, at least in my opinion.  He is quite unique in his upgrade abilities and follows along the Chop Chop route with a sword and shield.

If I just had one Doom Stone I would be heavily inclined to go with Jaded Fighter up top.  Why?  Simple, Column Club is quite impressive with just the base upgrades.  Adding the abilities of Jaded Fighter to the shield (tertiary attack) it makes a for a nice combination.

Column Clubber is what I would suggest for most people...It takes a hard hitting attack and adds even more damage.

I would recommend Jaded Fighter to those who think like myself and view Column Club good enough as is...Jaded Fighter takes the shield and enhances it greatly with Cracking Up, which does 25-38 damage to surrounding enemies in a very nice radius.  It also takes advantage of his unique ability with the shield.

On the bottom end I would have to say Serious Spinner is definitively the better path.  I hate it when something is so clear, but Carved Belt was a severe disappointment.  Part of this might have been from the pictures and descriptions conveying it was going to be a 360 degree projectile emanating from the belt.  I honestly have to say, Spin the Tables (the Soul Gem) would have been better suited here with Carved Belt than Jaded Spin and Belt Pelters.  Honestly, just making Stoney Spin/Revolutionary Belt do even more damage would have been a bigger asset than Carved Belt as a whole.

Serious Spinner upgrades the Spin Right Around attack and takes it up to the 65-98 range.  It is hard to appreciate in the training grounds at Woodburrow, but works quite well against tougher enemies in arenas and story mode.  Similarly, just The Harder They Fall does more damage than the Carved Belt Path...that is ridiculous and should not have been...

If Carved Belt shot off multiple projectiles from your belt, simultaneously, and in all directions, I would have no qualms with it.  As is, one at a time with minimal damage and cast from the same serving point is supremely lackluster.

I had it pegged as the perfect compliment to Jaded Fighter as I had anticipated it to have good range and be multidirectional.  It was neither.  Up top you can honestly pick between Sword and Shield...On the bottom there is really no contest.  Carved Belt offers little benefit in any phase of the game.

That said, Doom Stone is a great Swapper and can be a charged, heavy hitter with Column Clubber and Serious Spinner, or a defensive whiz with Jaded Fighter and Serious Spinner.  My main advice is simply to avoid the Carved Belt Upgrade Path.

Currently Playing

  • Skylanders Imaginators
  • Mario Kart 8 Deluxe
  • NBA Playgrounds
  • Minelogix-Minecraft PC
  • Stardew Valley - PC
  • Wii Fit U (Wii U)
  • Animal Crossing amiibo Festival (Wii U)
  • Yoshi's Wooly World
  • Animal Crossing New Leaf 3DS

Blog Archive